A garage door starts closing, someone walks through the opening, and the door immediately reverses. Garage door safety sensors are usually responsible for that response. These small devices sit near the bottom of the garage door tracks and create an invisible beam across the doorway. When a person, pet, bicycle, box, or another object interrupts the beam while the door is closing, the opener should stop and reverse the door.
Although the technology is fairly simple, sensor problems are among the most common reasons an automatic garage door refuses to close normally. Fortunately, dirty lenses, minor misalignment, blocked beams, and loose wiring can often be identified without complicated equipment.
What Are Garage Door Safety Sensors?
Garage door safety sensors use photoelectric technology to help prevent an automatic garage door from closing on an obstruction. They are commonly called photo eyes, safety eyes, or photoelectric sensors.
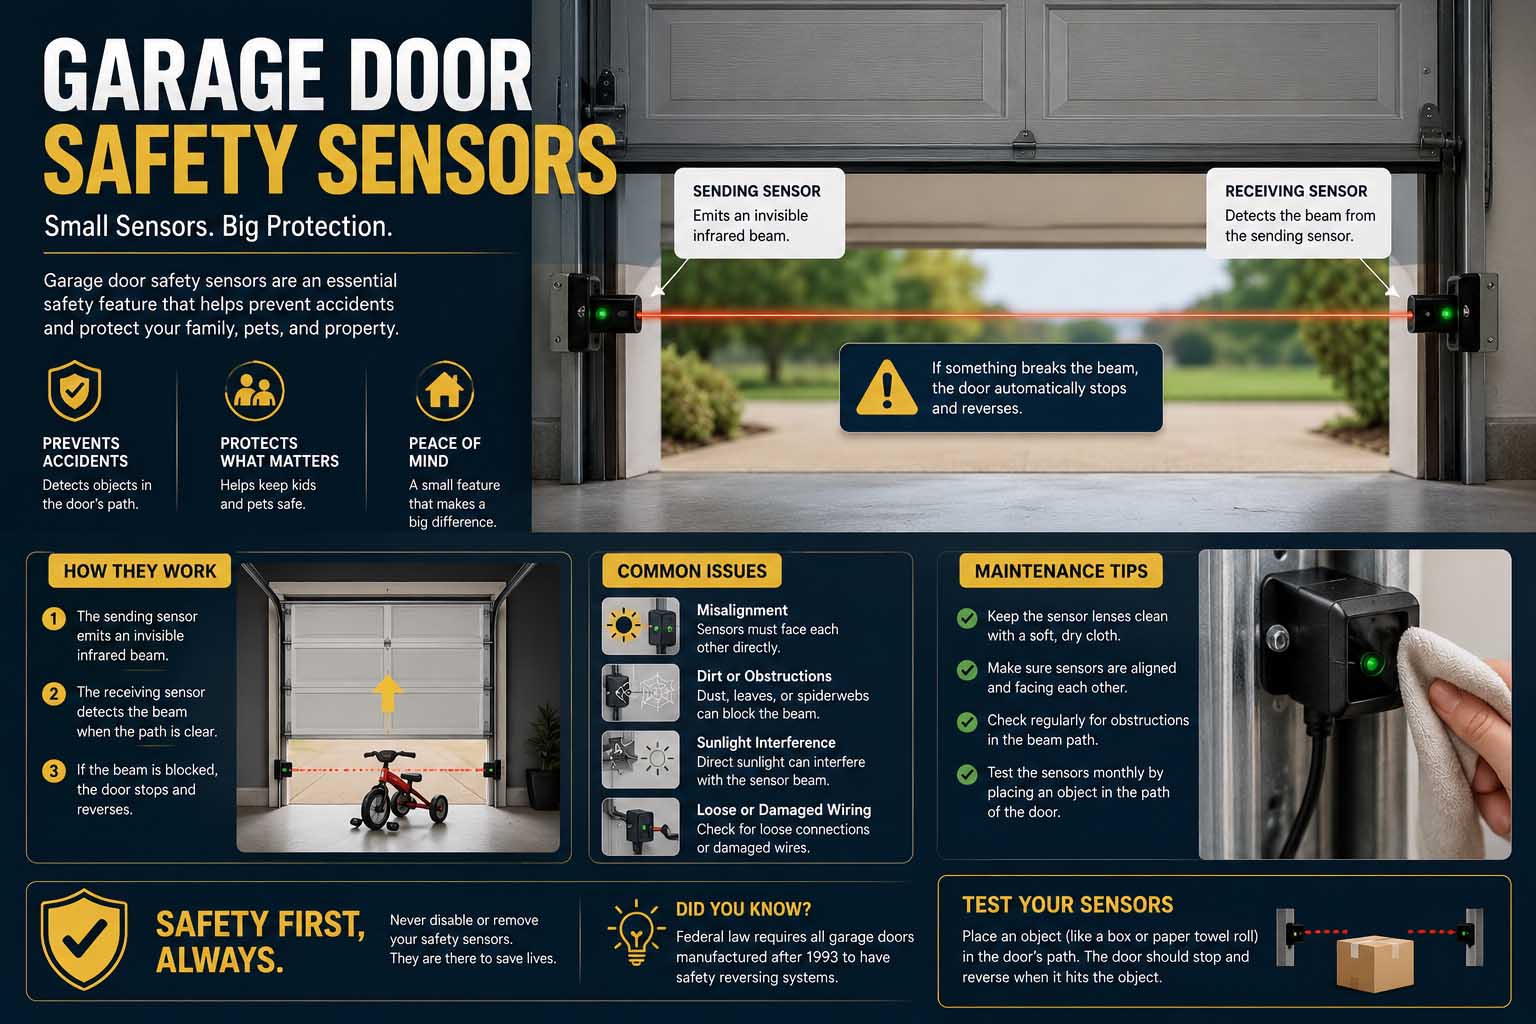
A typical system uses two sensor units installed on opposite sides of the garage opening, usually close to the floor. One side sends an infrared beam, while the other receives it.
When the receiver detects the beam, the opener knows the path is clear. However, when something blocks the beam, the safety system prevents normal downward operation or reverses a closing door.
For homeowners interested in similar technology elsewhere in the house, smart home sensors can use several sensing methods to detect motion, doors opening, temperature changes, water leaks, occupancy, and other conditions.
How Do Garage Door Safety Sensors Work?
The basic process happens continuously while the garage door opener has power.
First, the transmitting sensor sends an invisible infrared signal toward the receiving sensor. Next, the receiver checks whether that signal reaches it correctly.
As long as both units remain aligned and nothing blocks the beam, the opener can close the door normally.
If something interrupts the beam, the opener’s control system recognizes a safety condition. As a result, the door may refuse to move downward or may reverse if it has already started closing.
This creates a simple safety chain:
Transmitter → infrared beam → receiver → opener control system → door response
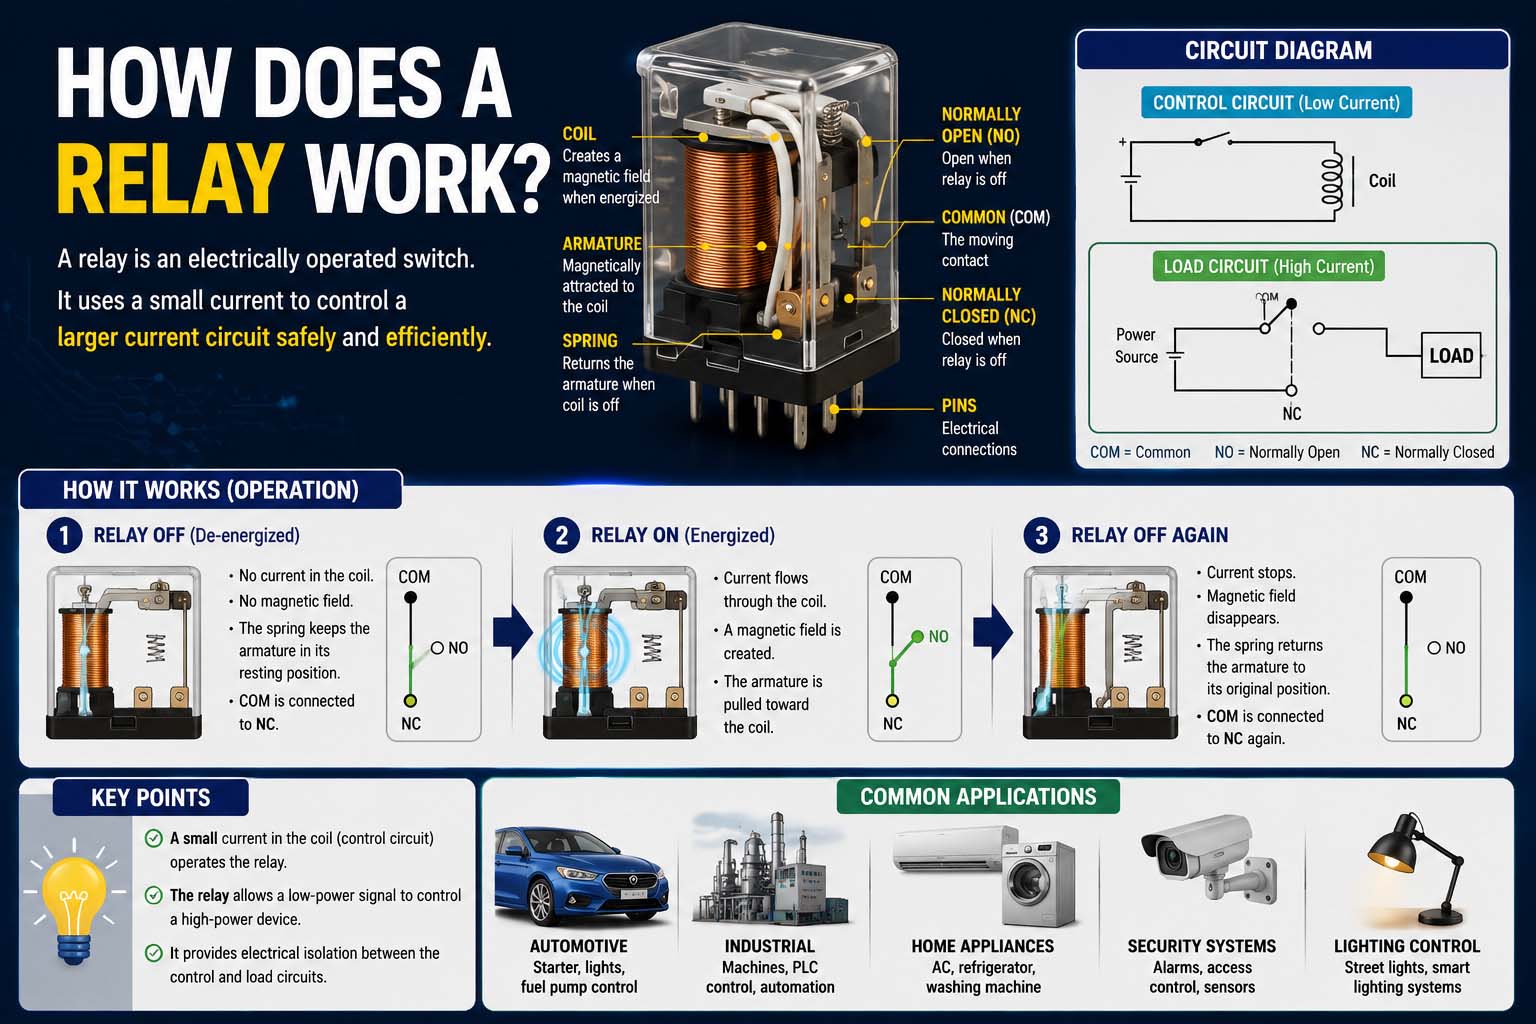
The sensors are only one part of the opener’s electrical and control system. For example, understanding how does a relay work can also help explain how low-power control signals can operate or switch other electrical components, although exact garage opener circuitry varies by model.
Why Garage Door Safety Sensors Matter
A garage door can be large and heavy. Therefore, relying only on someone noticing an obstruction would create unnecessary risk.
Photoelectric sensors provide an extra protective layer because they monitor the doorway close to floor level. That position helps the system detect objects that may be underneath a descending door.
The U.S. Consumer Product Safety Commission’s garage door opener safety guidance explains safety considerations for automatic residential garage door openers and reversing systems.
Still, sensors do not replace normal garage door maintenance. Springs, cables, tracks, opener force settings, controls, and the door’s balance also affect safe operation.
Likewise, the photo-eye system should not be confused with every other safety feature built into an opener. Modern garage door systems can use several controls and sensing methods together.
Signs Your Garage Door Safety Sensors Have a Problem
Sensor trouble often appears as a door that opens correctly but has trouble closing.
For example, you may notice:
- The garage door begins closing and immediately reverses.
- The door refuses to close from the remote.
- A sensor indicator light is off or behaving differently than usual.
- The opener’s lights flash after a closing attempt.
- The door closes only when you continuously hold the wall control.
- The problem appears after a sensor gets bumped.
- Dirt, boxes, tools, or other objects are near the sensor beam.
However, these symptoms do not always prove the sensors are defective. Wiring faults, opener settings, track problems, or other mechanical and electrical issues can produce similar behavior.
Therefore, start with simple checks before buying replacement parts.
How to Align Garage Door Safety Sensors
Misalignment is one of the first things to check when both sensors appear intact but the garage door will not close.
The exact indicator-light behavior varies between manufacturers and models. Consequently, use your opener’s manual when interpreting LEDs or diagnostic codes.
Step 1: Remove Anything Blocking the Sensor Beam
Inspect the area between the sensors.
Move storage boxes, garden equipment, toys, cables, leaves, and other items away from the doorway. Even if an object does not appear directly in front of the lens, clearing the area makes troubleshooting easier.
Step 2: Clean Both Garage Door Sensor Lenses
Dust, dirt, cobwebs, or moisture can interfere with the optical path.
Use a clean, soft cloth to gently wipe each lens. However, avoid scratching the surface or saturating electrical components with cleaning liquid.
Step 3: Inspect the Safety Sensor Brackets
Both units need to face each other correctly.
A bicycle, garbage bin, lawn mower, or other object can easily knock a bracket out of position. Therefore, check whether either sensor looks tilted, twisted, or noticeably higher than the other.
Step 4: Align the Garage Door Sensors
Loosen the sensor bracket only as much as needed. Then, make small adjustments until the units face each other properly.
Indicator lights can help on many models. Once you restore the alignment, secure the brackets without moving the sensors again.
For a more focused walkthrough, how to align garage door sensors covers the alignment process and common problems that can prevent the photo eyes from communicating correctly.
Step 5: Test the Safety Sensor System
After alignment, test normal closing operation according to the manufacturer’s instructions.
Never assume that an illuminated indicator alone proves the entire safety system works correctly.
Garage Door Safety Sensors Troubleshooting Guide
When alignment does not solve the problem, work through the likely causes systematically.
| Symptom | Possible Cause | First Check |
|---|---|---|
| Door reverses while closing | Beam obstruction or misalignment | Clear and align sensors |
| Sensor light is off | Power or wiring issue | Inspect visible connections |
| Problem happens in bright sunlight | Optical interference may be involved | Check alignment and manufacturer guidance |
| Sensor works intermittently | Loose wire or unstable bracket | Inspect wiring and mounting |
| Lenses look cloudy or dirty | Dirt or moisture | Gently clean lenses |
| Sensors align but door still fails | Another opener or door fault | Check diagnostics/manual |
Start with the least invasive checks. Usually, cleaning and inspecting the beam path take only a few minutes.
If the problem continues, check accessible low-voltage sensor wiring for obvious damage. However, disconnect power before servicing components when the manufacturer’s instructions require it. Also, avoid working inside powered electrical equipment unless you are qualified to do so.
Chamberlain Garage Door Safety Sensors and Other Brands
Homeowners often search specifically for Chamberlain garage door safety sensors, but replacement compatibility should never be assumed based only on appearance.
Garage door opener manufacturers may use particular sensor designs, wiring arrangements, mounting hardware, diagnostic indicators, and compatibility requirements. Even products from related brands can vary by opener generation or model.
Therefore, identify your exact opener model before purchasing replacement sensors.
Look for the opener’s model information. Then, compare it with the replacement sensor specifications or manufacturer’s compatibility information.
This approach is safer than buying a generic-looking sensor and hoping it works.
Can You Bypass Safety Sensors on a Garage Door?
People sometimes search for how to bypass safety sensors on garage door when a sensor fault prevents the door from closing. However, bypassing, disabling, relocating, or defeating a safety device can remove protection designed to detect an obstruction in the door’s path.
For that reason, troubleshooting the underlying fault is the better approach.
Clean the lenses, remove obstructions, restore alignment, inspect accessible wiring, and check the opener’s diagnostic information. If those steps do not restore normal operation, use a compatible replacement or contact a qualified garage door technician.
Do not treat a permanent bypass as a repair.
Garage Door Sensor Wiring and Electrical Problems
Sometimes the photo eyes are perfectly aligned, yet the opener still reports a sensor problem.
In that situation, wiring deserves attention.
Garage door sensors typically connect to the opener through low-voltage wiring. Over time, a wire can become loose, pinched, cut, corroded, or damaged near a connection point.
First, inspect only what you can access safely. Look for visibly damaged insulation, loose connections, staples driven tightly into cables, or wires that have been pulled away from a sensor.
Electrical control systems also rely on several switching components. Learning about types of switches can provide useful background on how different electrical and electronic systems control circuits, though an opener’s internal design should be serviced according to its manufacturer’s instructions.
If you suspect damage inside the opener itself, professional diagnosis may be the safer option.
How to Keep Garage Door Sensors Properly Aligned
If you repeatedly realign the sensors and the problem returns, the alignment itself may not be the root cause.
First, check the mounting brackets.
A loose bracket can vibrate or shift when the door operates. Likewise, a bracket may bend after being struck by stored equipment.
Also, inspect the area around the sensors. If trash cans, bicycles, tools, or children’s equipment regularly bump them, reorganizing the garage may prevent repeated failures.
Once the units are positioned correctly, tighten their mounting hardware according to the manufacturer’s guidance. However, avoid overtightening plastic components or forcing a bent mount into position.
When Should Garage Door Safety Sensors Be Replaced?
Do not replace sensors automatically because a garage door fails to close once.
First, rule out simple causes such as dirt, an obstruction, or misalignment.
Replacement becomes more reasonable when a compatible sensor no longer functions despite correct alignment and intact connections. Likewise, physical damage to the housing or lens may justify replacement.
Water intrusion and damaged wiring may also require replacement or professional repair.
When shopping, match the replacement to the exact opener model or an officially listed compatible system. In particular, do not choose solely by price.
Garage Door Safety Sensor Maintenance
Photo eyes generally require little routine maintenance, but a few habits can prevent unnecessary problems.
Keep the area around each sensor clear. Likewise, gently clean the lenses when dust or cobwebs accumulate.
While organizing your garage, avoid leaning tools, lumber, bicycles, or other equipment against the sensor brackets. Then, if something does hit a sensor, inspect its position before assuming the opener has developed a larger fault.
You should also test the garage door’s safety features periodically according to the opener manufacturer’s instructions.
A minor impact can misalign even a sensor system that has worked correctly for years.
Common Mistakes When Troubleshooting Garage Door Sensors
One common mistake is immediately assuming the sensor has failed.
Often, the real problem is simply a blocked or misaligned beam.
Another mistake is adjusting several components at once. If you change the sensors, opener settings, brackets, and wiring simultaneously, identifying the original fault becomes much harder.
Instead, make one logical check at a time.
Also, avoid using force to make a garage door close when the safety system reports a problem. The warning may indicate something genuinely blocking the doorway.
Finally, do not assume every garage door opener uses identical diagnostic lights. Always check the instructions for your specific model.
FAQs About Garage Door Safety Sensors
Where Are Garage Door Safety Sensors Located?
They are typically mounted near the bottom of the garage door opening on opposite sides, close to floor level. Exact positioning depends on the system and installation requirements.
Why Is My Garage Door Sensor Light Blinking?
A blinking or abnormal indicator may suggest misalignment, obstruction, wiring trouble, or another sensor fault. However, indicator meanings vary by manufacturer, so check the manual for your model.
How Do I Know If My Garage Door Sensors Are Aligned?
Many systems use indicator lights to show proper communication between the photo eyes. Still, you should follow the manufacturer’s testing procedure to confirm correct operation.
Can Sunlight Affect Garage Door Safety Sensors?
Strong direct light can sometimes contribute to optical sensor problems. Before blaming sunlight, though, clean the lenses and verify that the sensors are firmly and correctly aligned.
Why Does My Garage Door Open but Not Close?
An interrupted safety beam is one possible cause. However, misalignment, damaged wiring, opener faults, track issues, or other problems may also prevent closing.
Can I Replace Garage Door Sensors Myself?
Some homeowners can replace compatible low-voltage sensor assemblies by carefully following manufacturer instructions. However, if troubleshooting involves internal electrical components, springs, cables, or uncertain wiring, professional service is the safer choice.
Keep Your Garage Door Safety System Working Properly
Most garage door safety sensors are easy to overlook until the door suddenly refuses to close. Yet that interruption can mean the system is doing exactly what it was designed to do.
Start troubleshooting with the simple possibilities: clear the beam, clean the lenses, inspect the brackets, verify alignment, and check visible wiring. Then, use your opener’s model-specific diagnostic information before replacing components.
Above all, treat a sensor fault as something to repair rather than something to defeat. A properly operating photo-eye system adds a valuable layer of protection every time your automatic garage door closes.