
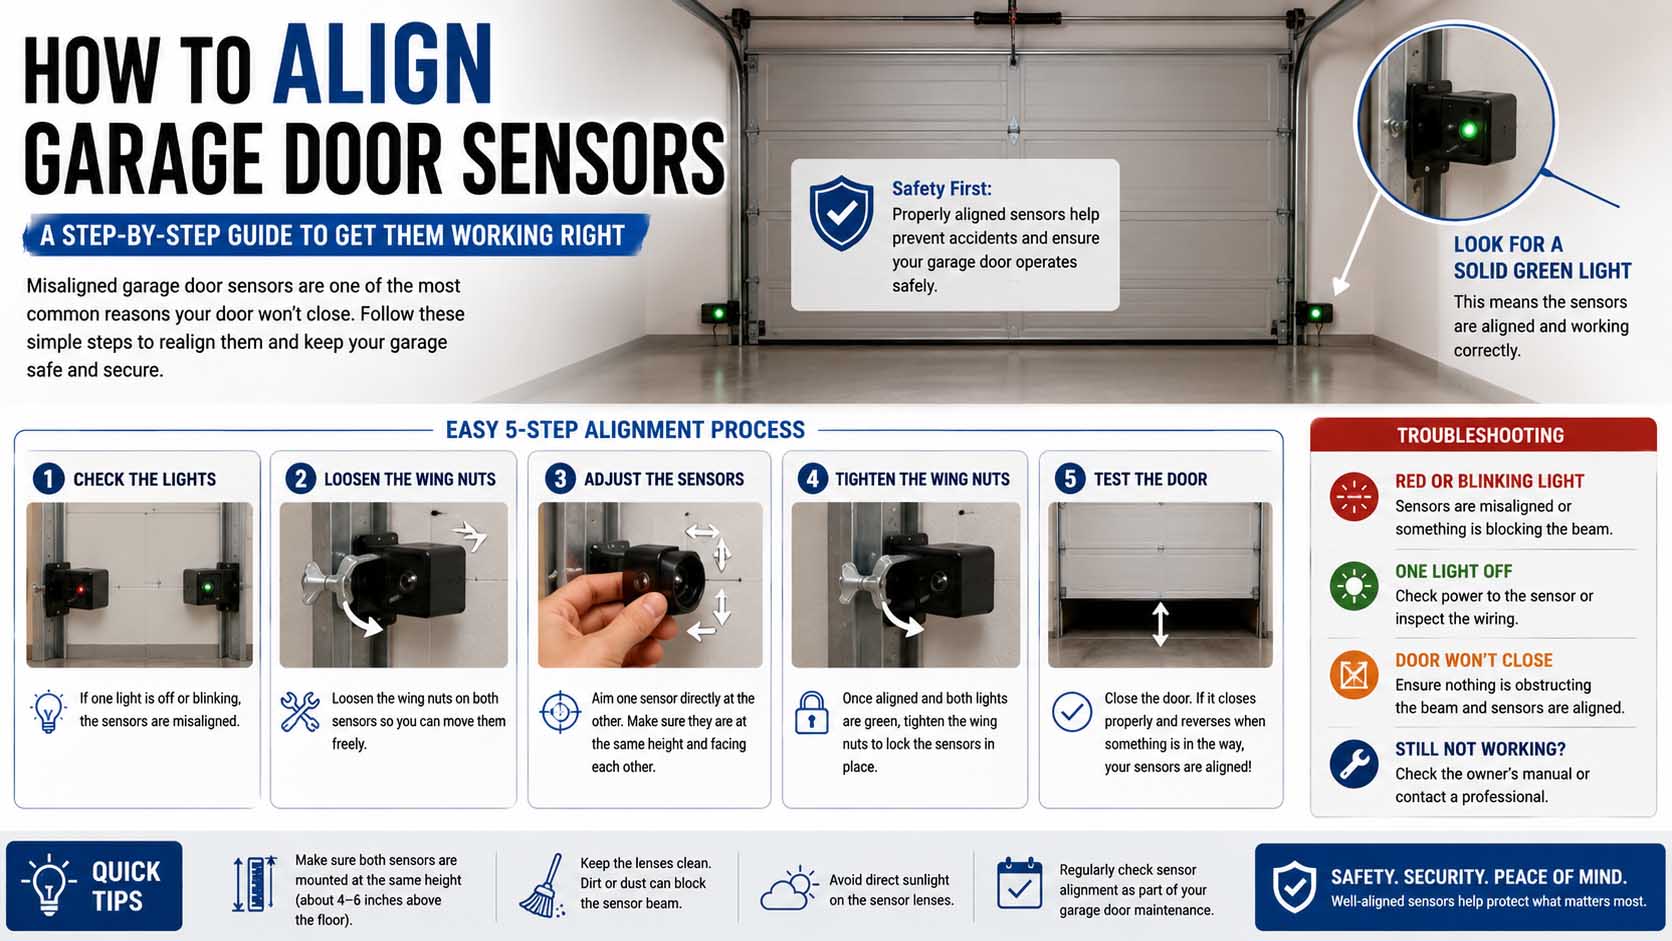
You press the garage door remote, but instead of closing normally, the door stops, reverses, or refuses to move. In many cases, the safety sensors near the bottom of the door are the problem. Fortunately, learning how to align garage door sensors is usually straightforward, and many homeowners can correct a minor alignment issue without replacing any parts.
Garage door safety sensors work as a pair. One sensor sends an invisible infrared beam across the doorway, while the other receives it. When the sensors cannot communicate because something blocks the beam or one unit points in the wrong direction, the opener may prevent the door from closing.
However, alignment is not the only possible problem. Dirty lenses, loose brackets, damaged wiring, sunlight, or a faulty sensor can produce similar symptoms. Therefore, a good repair starts with checking the entire sensor setup rather than immediately moving the brackets.
How Garage Door Safety Sensors Work
Most modern garage door openers use photoelectric safety sensors mounted close to floor level on opposite sides of the garage opening. Their main purpose is to detect an obstruction in the door’s path.
Normally, the transmitting sensor sends an infrared beam directly toward the receiving sensor. As long as the receiver detects that beam, the opener knows the path is clear. However, when a person, pet, bicycle, storage box, or other object interruptss the beam, the system tells the opener not to close the door normally.
This setup is a practical example of what is a transducer in everyday technology because sensors convert a physical condition into an electrical signal the control system can interpret.
Although models vary, many sensors also have small indicator LEDs. A steady light commonly indicates normal operation, while a blinking or missing light may point to misalignment, an obstruction, a wiring issue, or another fault. Since LED behavior varies by manufacturer and model, check the opener’s manual before treating a particular light pattern as a definite diagnosis.
Signs Your Garage Door Sensors May Be Misaligned
Misaligned sensors often create noticeable symptoms. For example, the garage door may begin closing and immediately reverse. Alternatively, it may refuse to close through the remote while still responding differently to the wall control.
You may also notice one sensor light blinking while the other remains steady. In some systems, the garage door opener’s main light may flash a specific number of times to indicate a safety-sensor fault.
However, don’t assume alignment is always responsible. First, check for a broom, box, bicycle tire, cobweb, leaf, or other object crossing the beam.
Next, inspect the lenses. Dust and grime can sometimes interfere with the infrared signal even though the sensors themselves remain correctly positioned.
How to Align Garage Door Sensors Step by Step
Before adjusting anything, keep people, pets, vehicles, and objects away from the garage door. Also, avoid working underneath a moving door. If you need to loosen hardware or work around electrical connections, disconnect power to the opener first and follow the manufacturer’s safety instructions.
1. Inspect the Sensor Area
Start with the simplest possibility. Look directly between the two sensors and make sure nothing blocks their line of sight.
Because sensors sit only a short distance above the floor, ordinary garage clutter can easily interfere with them. Even a small object positioned directly in front of one lens may stop the system from operating correctly.
Then inspect both lenses. If you see dust, dirt, or cobwebs, gently clean the lenses with a soft, dry or slightly damp cloth. Avoid scratching the plastic lens or soaking the sensor housing.
After cleaning, test the door again. If it works normally, alignment may not have been the problem.
2. Check the Sensor Indicator Lights
Next, look at the LEDs on both units. Depending on the manufacturer, the transmitting and receiving sensors may use different colors.
A solid indicator commonly suggests that the sensor has power and, depending on the model, may also indicate a good connection. Meanwhile, a blinking light often signals that the receiving sensor cannot consistently detect the beam.
Think of the sensors as electronic types of switches within a safety system: instead of requiring someone to press a physical button, they help determine whether the opener should permit normal closing based on the condition of the doorway.
Still, LED meanings are model-specific. Therefore, use the owner’s manual or the manufacturer’s troubleshooting guide when interpreting unusual flashing patterns.
3. Check Whether the Sensors Face Each Other
Stand back and compare both sensors visually. They should generally sit at similar heights and point directly toward each other across the garage opening.
Sometimes a sensor gets bumped by a trash can, lawn mower, bicycle, or storage container. As a result, the mounting bracket bends slightly or the sensor rotates away from its partner.
If one sensor clearly points upward, downward, or sideways, you have probably found the problem.
4. Loosen the Sensor Carefully
If adjustment is necessary, slightly loosen the nut, wing nut, or mounting fastener holding the sensor in place. Do not completely remove the sensor unless the manufacturer’s instructions require it.
Next, move the sensor gently. Small adjustments are usually better than large ones because the infrared beam needs to reach the opposite unit accurately.
Watch the indicator light as you move the sensor. On many systems, the receiving sensor’s LED becomes steady when alignment is restored.
Once you find a stable position, hold the sensor still and tighten the fastener carefully. However, avoid overtightening it because excessive force could move the bracket again.
5. Confirm Both Sensors Are Secure
After adjusting the sensors, lightly check each bracket. Neither sensor should wobble or rotate easily.
If a bracket is loose, normal vibration from the garage door can gradually knock the sensor out of alignment again. Likewise, a bent bracket may make correct alignment difficult to maintain.
If necessary, straighten or replace damaged mounting hardware according to the opener manufacturer’s instructions.
How to Align Garage Door Safety Sensors More Precisely
Visual alignment works in many cases. However, stubborn problems may require a more careful approach.
First, compare the height of both sensors from the garage floor. You can use a tape measure to confirm that the mounting positions are reasonably consistent.
Then, if needed, use a long level or a taut string as a visual reference across the doorway. The goal is not simply to make the sensor housings look symmetrical. Instead, you need the transmitter’s beam to reach the receiver reliably.
Once the receiving indicator becomes stable, tighten the hardware and test the system several times.
This process resembles a basic open loop vs closed loop control concept. The opener relies on sensor feedback before allowing normal operation, so the system responds when the expected safety condition changes.
How to Align Garage Door Sensors LiftMaster Systems Use
If you’re specifically searching for how to align garage door sensors LiftMaster openers use, the basic process is similar: remove obstructions, clean the lenses, check the mounting brackets, and adjust the sensors until their indicators show proper operation.
However, LiftMaster has produced many opener and sensor models. Therefore, indicator colors, diagnostic codes, wiring arrangements, and troubleshooting procedures can differ.
For that reason, locate the model number of your garage door opener and follow the matching manufacturer’s instructions. Model-specific guidance is especially useful when both sensors appear correctly aligned but the opener still reports an error.
Also, don’t reposition sensors outside their intended mounting arrangement just to obtain a steady light. Their placement is part of the garage door’s safety system.
What If Alignment Doesn’t Fix the Problem?
If you know how to align the sensors on a garage door but the problem continues, move to the next troubleshooting steps.
Inspect the Wiring
Follow the low-voltage wires running from each sensor toward the opener. Look for visible cuts, loose connections, crushed sections, corrosion, or damaged insulation.
A wire can become damaged when storage items hit it or when staples pinch it too tightly. Consequently, a perfectly aligned sensor may still fail because it isn’t receiving power or communicating correctly.
Do not attempt electrical repairs beyond your experience level. Instead, contact a qualified garage door technician if the wiring looks damaged or you’re uncertain about safe testing.
Look for Sunlight Interference
Direct sunlight can sometimes interfere with photoelectric sensors, particularly when strong light shines directly into the receiving unit.
If the problem occurs mainly at a certain time of day, sunlight may deserve closer attention. However, don’t permanently cover or disable a safety sensor. Instead, check the manufacturer’s approved recommendations for shielding or repositioning the unit.
Check for Vibration or Loose Hardware
Suppose you align the sensors successfully, but the same issue returns several days later. In that case, the problem may involve the mounting hardware rather than the electronic sensor.
Therefore, a loose fastener can gradually allow a sensor to move.
Meanwhile, a damaged track or bent bracket may also affect sensor positioning. Fixing the underlying mounting issue can prevent repeated realignment.
Understanding the Sensor and Opener Connection
Garage door sensors do not usually control the motor directly. Instead, they provide information to the opener’s control circuitry, which determines whether the door can continue closing.
If you’re learning how does a relay work, you may notice a related principle in many automated systems: a low-power control signal can influence the operation of a larger electrical load. Garage door openers combine sensors, control electronics, switches, and motor circuitry to coordinate movement safely.
Still, the exact electronics vary considerably among models. Therefore, troubleshooting should focus on observable symptoms and manufacturer diagnostics rather than assumptions about internal circuitry.
Common Mistakes When Aligning Garage Door Sensors
One common mistake is adjusting the sensors before checking for dirt or obstructions. Since cleaning takes only a moment, always start there.
Another mistake is making large movements. Usually, slight adjustments are enough to restore the infrared connection.
Likewise, some homeowners tighten the sensor bracket aggressively after finding the correct position. Unfortunately, tightening can rotate the sensor and immediately ruin the alignment.
Also, avoid bypassing, removing, taping over, or intentionally defeating the safety sensors simply to make the door close. The sensors exist to detect objects in the door’s path.
Finally, don’t assume every blinking LED means the same thing. Diagnostic lights vary between brands and models, so the owner’s manual remains the best reference for model-specific codes.
Quick Troubleshooting Guide
| Symptom | Possible Cause | What to Check |
|---|---|---|
| Door reverses while closing | Obstruction or sensor issue | Clear doorway and inspect sensors |
| One sensor LED blinks | Possible misalignment | Adjust sensor position and check manual |
| Sensor light is off | Power or wiring problem | Inspect connections and visible wiring |
| Problem returns repeatedly | Loose or damaged bracket | Check mounting hardware |
| Problem happens at certain times | Possible sunlight interference | Observe direct light on receiver |
| Both sensors appear normal | Another opener issue | Check diagnostics or seek service |
The table can help narrow down the cause, but symptoms vary among garage door opener models. Therefore, use it as a starting point rather than a replacement for manufacturer instructions.
How to Test the Garage Door After Alignment
Once you believe the sensors are aligned, clear the doorway and reconnect power if you disconnected it.
First, operate the door normally and confirm that it closes smoothly. Repeat the test several times because an unstable sensor may work once and fail during the next cycle.
Next, follow your garage door opener manufacturer’s recommended safety-reversal test. Typically, this involves confirming that the photoelectric system detects an obstruction placed appropriately in the beam path. However, use the exact procedure specified for your model.
If the safety system does not respond correctly, stop using the automatic closing function and arrange professional service.
When Should You Replace a Garage Door Sensor?
Alignment cannot repair a sensor that has physically failed. Replacement may be appropriate if a sensor housing is cracked, its wiring or internal components are damaged, or manufacturer-approved troubleshooting identifies the sensor as faulty.
However, don’t replace a sensor simply because an indicator light blinks. Misalignment, wiring problems, obstructions, and poor connections can produce similar symptoms.
Replacement parts should also be compatible with the specific opener model. Even sensors that look similar may not work with every control system.
FAQs About Garage Door Sensor Alignment
How do I know if my garage door sensors are aligned?
Indicator lights are usually the easiest clue. When the system is working correctly, the relevant sensor LEDs generally remain steady according to the manufacturer’s specifications. The door should also close normally and pass the recommended safety test.
Can I align garage door sensors myself?
Minor adjustments are often manageable for homeowners. You can clean the lenses, remove obstructions, check mounting positions, and carefully adjust loose sensor brackets. However, damaged wiring, faulty components, bent tracks, or unexplained electrical problems are better handled by a qualified technician.
Why is one garage door sensor blinking?
A blinking light may indicate misalignment, an obstructed beam, wiring trouble, or another sensor fault. Because meanings vary by model, check the manufacturer’s diagnostic information.
Do both garage door sensors need to be at exactly the same height?
They need to be installed and positioned according to the manufacturer’s requirements so the transmitter and receiver communicate reliably. If someone has moved a bracket, comparing their heights can help identify obvious misalignment.
Why won’t my garage door close after I aligned the sensors?
If alignment looks correct, clean the lenses again and inspect the wiring and brackets. Next, check the opener’s diagnostic indicators. If the safety system still fails, professional troubleshooting may be necessary.
Keep the Sensors Working Reliably
Once you understand how to align garage door sensors, future troubleshooting becomes much easier. Start with obstructions and dirty lenses, then inspect indicator lights, brackets, positioning, and wiring before assuming a component has failed.
Afterward, keep boxes, tools, bicycles, and other garage items away from the sensors. Also, clean the lenses occasionally and watch for loose mounting hardware.
Most minor alignment problems have a simple cause. However, because garage door sensors are safety devices, never bypass them to solve a closing problem. If careful alignment and basic troubleshooting don’t restore normal operation, a qualified garage door professional can inspect the opener, wiring, sensors, and mechanical system safely.